Showing posts with label Foam Adhesive Strips. Show all posts

Friday, August 25, 2023

Stampin' Up! Merry & Bright and Merry Bold & Bright Christmas Stampathon Card

Welcome to the July Christmas Stampathon 2023 

Our August Challenge is Sentiment As The Star

Make multiple Christmas Cards letting your Christmas sentiment be the star of the show

I couldn't resist using the Block sentiments from the Stampin' Up! Merry & Bright Stamp Set to create a Christmas Tree on Vellum. I used the Fa La La word paper from the matching Merry Bold & Bright Designer Series Paper to add a sub sentiment to the card I finished the card using a few Iridescent Discs also from the collection of products

Colours Used: Granny Apple, Poppy Parade, Lemon Lime Twist, Melon Mambo & Garden Green

Be sure to pop over to the group and join in with this months and previous challenges and check out my VIDEO below to see how these cards were made and the Supplies I have used 


SHOP NOW - go to my Online Store or contact me to place an order RIGHT NOW


Be sure to check out my CLASSES below or consider Hosting a Party and share your love of Stampin' Up! and the NEW Catalogue with your friends.
 My Classes are mostly monthly on a Sunday exact times and dates are in the Classes Tab above.

Let's Go Shopping Classes - Video Tutorials
We will be making projects with all brand new products & fun to be had!! 

RSVP to me ellen@dewoodbridge.com or 0421074703 to RESERVE your spot.  

Enjoy Ellen 

Wednesday, October 21, 2020

Stampin’ Up! Happiest of Birthdays with In Good Taste and Whale of a Time Shaker Card

One of my wonderful customers requested we make a Birthday Shaker Card in a recent class and I also shared it in a recent VIDEO everyone was so surprised how easy it was to make and that they no longer feel intimated making one. I have used the Stampin' Up! Happiest Of Birthdays stamp set, Stitched Rectangle Dies, Whale of Time Paper and Sequins, In Good Taste Paper, Playing With Patterns Ribbon and Elegant Gems. To create the Shaker section. I have used Window Sheets, 2' and 2 1/4" Circle Punch and Foam Adhesive Strips.

Click on the Photo below for a List of Supplies and To visit my Shop
 

To see how this card came together watch my VIDEO on You Tube

 SHOP NOW - go to my Online Store or contact me to place an order RIGHT NOW!


For all orders over $60 receive this amazing Tutorial Bundle FREE
__________________________________________________

We all love the gorgeous Stampin' Up! Designer Series Paper, and during this incredible sale, you can enjoy a 15% discount on select papers from our current catalogues! Now is a great time to stock up and save on some of our most popular paper designs!

__________________________________________________

__________________________________________________


The brand new August - December 2020 Mini Catalogue is LIVE NOW and you can order ONLINE RIGHT NOW . If you are in Australia and want your very own copy Contact Me and ill get one to you ASAP.


__________________________________________________


Be sure to check out my CLASSES below or consider Hosting a Party and share your love of Stampin' Up! and the NEW Catalogue with your friends.


 My Classes are mostly monthly on a Sunday exact times and dates are in the Classes Tab above. 


November Card Class

Sunday November 15th at 1pm. Cost $20 

We will be making projects with brand new Curvy Celebrations products along with friends and fun.

 In Person Class at my house in Narara


RSVP to me on 0421074703 to RESERVE your spot. 


Enjoy Ellen xxx

Tuesday, May 14, 2019

Stampin' Up! Butterfly Gala Shaker Card

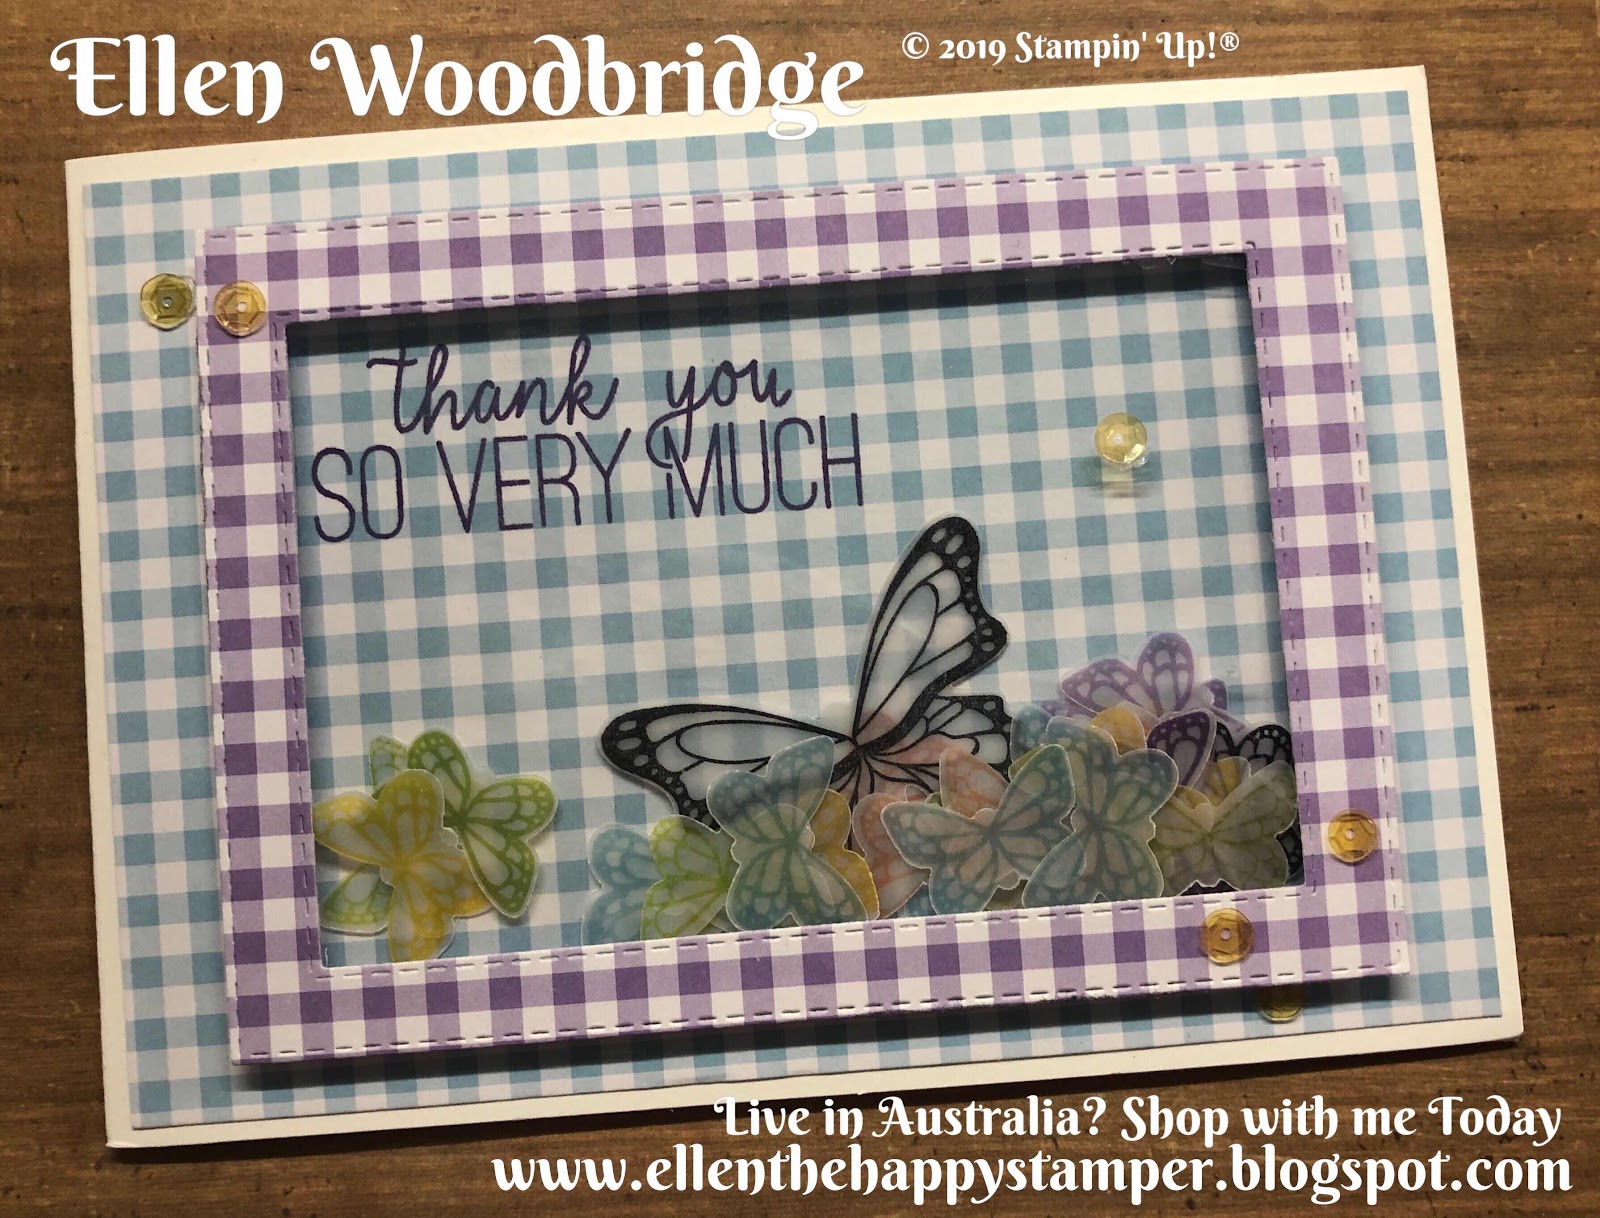
I made a promise to use my left over Stampin' Up! Vellum Butterfly Gala Butterflies in a shaker card and here it is! I have used Gingham Gala Paper and Stitched Rectangle Dies for the frame. Window Sheet and Foam Adhesive Strips to create the Shaker and Gingham Gala Sequins for a final pop. I love using my leftover bits to make another card. Do keep or toss bits like these butterflies?


To see how these cards came together you can watch the replay of the Facebook LIVE Video or below on You Tube


SHOP NOW - go to my Online Store or contact me to place an order RIGHT NOW!

_________________________________________________

_________________________________________________

_________________________________________________


_________________________________________________

__________________________________________________

Be sure to check out my CLASSES below or consider Hosting a Party and share your love of Stampin' Up! and the NEW Catalogue with your friends.

 My Classes are mostly monthly on a Sunday exact times and dates are in the Classes Tab above. 

Its time to say goodbye to many of our catalogue products so lets have one last play before they are gone forever
Come Along and Celebrate 2019-2020 Annual Catalogue with projects to make prizes, friends and fun!! 

RSVP to me on 0421074703 to RESERVE your spot.

Enjoy Ellen xxx


Monday, May 15, 2017

Double Take Stamp Card - Stampin' Dreams May Blog Hop


I am playing along with a brand new Blog Hop today Stampin Dreams I hope you enjoy and I hope to lay along with these regularly. I have a confession to make, I bought these AMAZING Sprinkles Embellishments - full of various sequins and pearls from the Occasions catalogue and not used them yet and I was compelled to use them before they retire at the end of this month. I have paired them with a shaker card. The hero of the card in my opinion is the Thanks from the Double Take stamp set that I stamped on Vellum in Peekaboo Peach and Pool Party ink which is a 2 step stamp set. I paired it with the Cupcakes & Carousels Paper Stack which i stamped on using the Carousel Birthday and Lift me Up Stamp set using Peekaboo Peach,  Watermelon Wonder and Pool Party Inks . I cut a frame from the card front sized piece using my Stampin' Trimmer. I suspended the vellum across the fram added a Window Sheet and then added Foam Adhesive Strips. Before I added it to card I did add some glue to the base piece and added the sprinkles to it so there were some embellishments around the card even when it is standing added a whole lot of  embellishments and put the frame onto a Whisper White card base.

I hope you get a change to visit everyone participating in the hop and enjoy their projects


To order any of the products used to make this card you will have to be quick as the items on the Retirement List are selling out fast, simply go to my SHOP NOW button above to go to my Online Store or contact me to place an order.  Don' forget to use this month's Hostess Code.


I can also show you how to make my projects at a party with you and your friends. Just contact me to organise a time to enjoy the amazing benefits our hostesses can earn and spend on anything in our catalogues including our Occasions Catalogue.

Thanks for Stopping by
Ellen

Saturday, December 31, 2016

Peaceful Pines and Christmas Pines with Mica Flakes Shaker Christmas Card

I have one final Christmas projects to share with you for the year. A super simple Shaker Card!


The card base is our Note Cards and Envelopes in Crumb Cake. I started with the piece of Whisper White card stock that could actually be in any festive colour. I stamped the star and dot stamp from the Christmas Pines stamps in Crumb cake and used the tree framelit from the Perfect Pines Framelits to make the window using the Big Shot. I then stamped the tree on the card base in Real Red Ink from the Peaceful Pines stamps through the Whisper White stamped piece for perfect placement. To create the shaker I attached a piece of Window Sheet to the back of the stamped Whisper White piece making sure to liberally use the Embossing Buddy her the sheet. Next I attached Foam Adhesive Strips to the outside of the tree she making sure the join is snug so no shaker bits come out. I added the Mica Flakes to the stamped tree on the card and attached the Whisper White piece over it pressing down on the foam adhesive to ensure it adheres properly. For a finishing touch I added a the Candy Cane Lane Baker's Twine to the bottom of note card a few ties finished with a bow! Now Its ready to SHAKE!

To purchase the products I have used to make this card please use the Shop Now button above. Many of the products used on this card are retiring and ONLY available while stocks last. I can also show you and your friends how to make Christmas cards in a class to get ready for Christmas NEXT year!!

Thanks for stopping by
Ellen

Saturday, July 23, 2016

Brushwork Alphabet and Baby Bear with Playful Palette Card

I was reminded that today its a super cute one year olds birthday so I just had to whip her up a cute card and I also had to personalise it just for her with the Brushwork Alphabet.


I stared by choosing my colour scheme and paper from the Playful Palette 6x6 Paper Stack. Next I stamped the Baby Bear teddy in Peekaboo Peach, Basic Grey Archival and Basic Black Archival inks on Very Vanilla card stock and matted it on Basic Black card stock. Next I cut a strip of the patterned paper and matted it into a piece of Sweet Sugarplum card stock to the length of the card. I used this piece to work out where to stamp the name and stamped it using the brushwork Alphabet in Sweet Sugarplum ink onto a Blushing Bride card base. I wrapped and tied a bow using the Peekaboo Peach Ruched Ribbon the patterned paper piece and attached it under the stamped name with Fast Fuse adhesive and then paced the Baby Bear piece over it with Stampin' Dimensionals. I cut a number one out from the Large Number Framelits with Silver Glimmer Paper and attached it using Foam Adhesive Strips beside the bear. As a finishing touch added a few 2016-2018 In Colour Enamel Shapes to the card and bear.

To order any of the products I have used on this project and more simply go to my SHOP NOW button above to go to my Online store or contact me to place an order.

I can also show you how to make this card at a party with you and your friends. Just contact me to organise a time to enjoy the amazing benefits our hostess can earn and spend on anything in our catalogues.

Thanks for stopping By
Ellen

Friday, July 8, 2016

Confetti Celebration & Sprinkles Punch Shaker Card with GDP#043

I really love shaker cards and could not resist to make one for this weeks Global Design Project Theme Challenge - Party


I started by cutting a Dapper Denim card stock to a card front size and die cut it using the Big Shot using the Project Life Cards & Labels Framelits to cut a window and stamped the frame using Dapper Denim ink with the banner stamp from Confetti Celebrations stamp set and added a piece of Window seat to the back of the frame. Next I stamped the Hooray in Smokey Slate ink onto Smokey Slate card stock and die cut using the Layering Circle Framelits in the Big Shot and attached it to the front of the frame. I inked the Time to Party stamp also from Confetti Celebrations with the Flirty Flamingo, Peekaboo Peach and Sweet Sugarplum  Stampin' Write Makers and stamped onto Whisper White card stock and punched with Decorative Label Punch and attached it to the bottom of the frame. To make the shaker I added Foam Adhesive Strips around the inside frame on the back of the card front and filled it with punched shapes in the matching colours and some Silver Glimmer Paper ones punched using the Sprinkles Punch. To make the backing for the shaker I stamped a piece of Whisper White card stock with the Ballon in Smokey Slate and Stars in Peekaboo Peach inks from the same stamp set and attached it to the Foam Adhesive Strips to complete the shaker and adhered the Shaker to a Thick Whisper White card base to complete the card.

To order any of the products I have used on this project and more simply go to my SHOP NOW button above to go to my Online store or contact me to place an order.

I can also show you how to make this card at a party with you and your friends. Just contact me to organise a time to enjoy the amazing benefits our hostess can earn and spend on anything in our catalogues.

Thanks for stopping By
Ellen

Saturday, June 4, 2016

Mixed Borders, Papillon Potpourri, Perfectly Wrapped Card with Global Design Project #038

I have been struggling with my mojo and time this week. So have taken on the Global Design Project Sketch Challenge #038 to help me climb out!! and I am fairly happy with the result 


I started by grabbing the Mixed Borders Stamp Set and the new 2016-2018 In Colours. I stamped the flower border in Sweetsugar Plum, Peekaboo Peach and Flirty Flamingo directly next to each other on a piece of Whisper White card stock. Next I took the leaf border and stamped it with Emerald Envy on top of the flower Borders. They are made to work together!!! I adhered this piece to a Thick Whisper White card base. I then took the Sweet Sugarplum card stock and made it the height of my card base and measured from the border piece to the edge of the card base to get those pieces the right width. I stamped the circle stamp from Perfectly Wrapped set in Versa Mark ink over both Sweet Sugarplum pieces. When I placed these pieces against the border stamping I felt they really clashed so I added a piece of vellum over the border stampin adhering it in the break in the border. This really helped a lot. I adhered the dot stamped pieces with NEW Foam Adhesive Strips (these are double the height of our Stampin' Dimensionals) to each side of the vellum covered border. I stamped the sentiment from Mixed Borders set in Dapper Denim on Dapper Denim card stock. I quickly covered this in clear embossing poor and melted it to give a touch of shine. this was punched out with this with the 1 3/4" Circle punch and matted it on a 2" circle punched Peekaboo Peach and Vellum and adhered them all together with Fast Fuse and to the card with triple layer Stampin' Dimensionals so it is higher that the Sweet Sugarplum pieces. As a final touch I stamped a butterfly from Papillon Potpourri in Dapper Denim ink onto vellum and covered it Clear embossing powder again to match the sentiment and punched it out with the Bitty Butterfly Punch and shared it using a Glue Dot folded in half.

To order any of the products I have used on this project and more simply go to my SHOP NOW button above to go to my Online store or contact me to place an order.

I can also show you how to make this card at a party with you and your friends. Just contact me to organise a time to enjoy the amazing benefits our hostess can earn and spend on anything in our catalogues.

Thanks for stopping By
Ellen